Framing inspection comes with a nice compliment

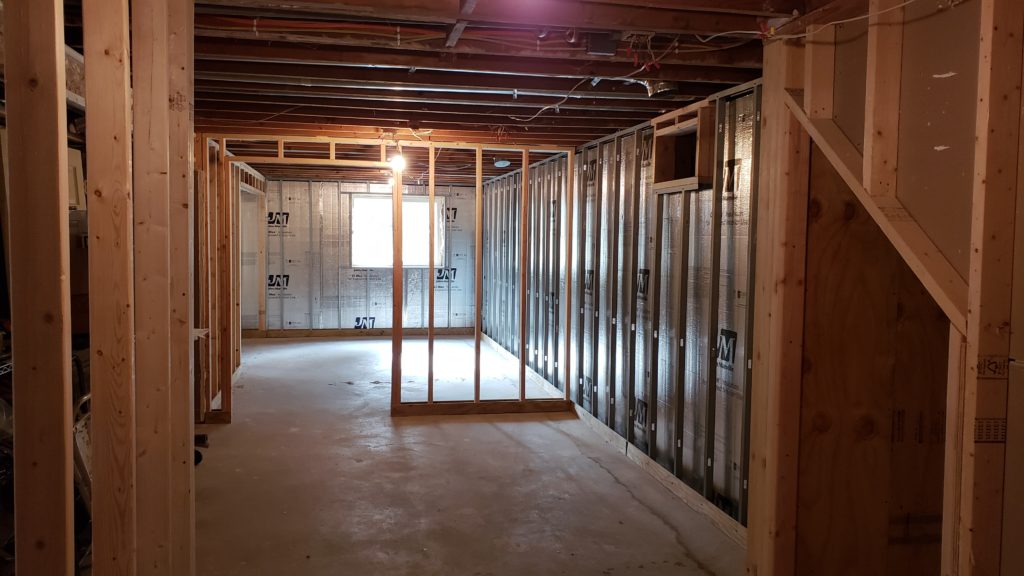
Today this basement finishing project passed framing inspection! Considering how many years it took to get to this point, this is a huge milestone.

Framing in a basement is a mixture of metal stud walls on the perimeter and wood stud walls in the center.

What’s more, the city building official gave me a nice compliment:

“I just have to say that you are doing really incredible work. You say you don’t do this for a living, but I’ve never seen professional carpentry of this quality. Really superb precision and craftsmanship. Very nice. Excellent job!”

Luke, Building Official, City of Columbia Heights

All that remains is electrical, drywall, paint, flooring, and trim carpentry.

Who sprays foam insulation over a junction box?

With plumbing and framing done, the next step is electrical work. Today I traced a circuit into the attic. Underneath some blown-in insulation, I found this. The flipper had used spray foam insulation on a junction box!

An attic junction box that has been covered with spray foam insulation.
An attic junction box that has been dug out of spray foam insulation.

I cut out the foam and open the box to inspect it.

Look at this tangled mess

My electrician decided not to fix the problems in the house. It’s clear that many junction boxes are over crowded and a tangled mess, like this one.

An over crowded junction box resulting in a tangled mess of electrical wires.

I have already mapped the circuits of every outlet and light in the house. See how most of the outlets and lights are on Circuit A? But I haven’t traced every wire yet. I am sure there are more hidden junction boxes and poor wiring.

Floorplan illustration showing circuits and electrical problems.
Exclamation marks show where hidden or missing junction boxes have been found so far.

Will another electrician truly make things right, or simply bypass the problem? Can I trust someone else to unravel each circuit and rewire them properly?

I have decided to track down the free neutral problem myself. I will do this by checking each room one at a time. I will make sure every outlet in the room is on the same breaker. The lights will be on a separate breaker. Every time I finish a room, I will remove them from the free neutral circuits and put them on their own breakers. It is a process of elimination.

Fixing one circuit at a time

I continue opening up cover plates and testing one circuit at a time. Each one requires a unique fix. Sometimes, a single room will have outlets on different breakers. Sometimes a piecemeal wire can be replaced with a single run. I work on every level of the house: the main floor, the attic, and the basement. It’s exhausting work.

A junction box with many light switches removed.

Fixing dining room circuits from the crawlspace below

The only way I can get to the dining room wiring is from the crawlspace I found. The last time I was in here, I was fixing heating problems. This time, I’m separating circuits and organizing them into new breakers.

Using a ladder to climb through a small basement window into a crawlspace.

I was able to add a new junction box inside the crawlspace. There’s something so satisfying about labeling your work so you don’t have to guess what each item does.

Working in a basement crawlspace while wearing a headlamp.
Junction with labeled wires.

Rewiring the upstairs bathroom

It’s a good idea to have a bathroom on its own circuit. But in this house, many of the rooms share the same circuit! To untangle the mess, I must run new wires to the switches and outlets. Also, there’s only one, so Amáda asked me to install a second outlet. She couldn’t have picked a trickier spot. I have to drill a wiring hole in the basement ceiling between tight pipes and framing.

Electrical switches and an outlet covered dangling from a wall junction box.
Using a long drill bit to drill a hole between two pipes in a basement ceiling.

The finished outlet is a great convenience, though. It’s on the right side of the sink. The other is far to the left, part of the same junction box as the light switch.

An outlet in a bathroom.

All electrical repairs complete!

Electrical service panel with the cover off showing neatly organized and labeled breakers.

I have completed all of the electrical repairs in the entire house. This is first time everything has worked properly in 5 years. I mapped every circuit in the house, re-wired them to eliminate unnecessary junction boxes, repaired faulty circuits, and re-balanced the load to each breaker. I even managed to do it by re-using 75% of the old wire, wire nuts, wire staples, and so on. Better yet, I was able to fish new wires from either the basement level or the attic without demolishing any of the finished walls on the main level. Now, the lights are steady, even when the garage door opens, the refrigerator pump kicks in, or the laundry machine changes cycles. The lights even seem to turn on just a bit faster. With these repairs completed, I’ll feel a whole lot better about covering up the walls knowing that all of the wiring behind them is properly balanced, 100% to code, and organized logically.

Lining up junction boxes with a cardboard mockup

Electrical rough-in inspection is on Friday, but the bathroom sconces won’t arrive until Saturday, so I made a full-size cardboard mockup. We’ll use this to position the junction boxes in the wall, and wire them up on time.

Using a cardboard mockup of a wall sconce to position a junction box on a wall.

Electrical rough-in weekend

My brother-in-law, Apollo, spent Thanksgiving weekend helping us run wires for our electrical rough-in. Just look at that smile! Getting him a long-tail T-shirt for Christmas.

Electrical rough-in of a basement with metal studs.

Series of smoke detectors added

With everything exposed, it was fairly easy for me to wire smoke detectors together in a network.

A smoke detector bracket mounted in a basement ceiling